搭建 ss 服务器
搭建原因不细说了,大家都懂.先在 vultr 购买日本的 vps,选择 centos7 系统,目前用 centos8 系统会导致每隔 10 分钟左右就需要重新更改端口。
安装 ss 服务
- 安装 ss 依赖库并安装 ss
yum -y install wget vim git epel-release
yum -y install libsodium python34-pip m2crypto #需安装 epel,libsodium 和 m2crypto 与加密有关,m2crypto 会提升加密速度.
/usr/bin/pip3.4 install git+https://github.com/shadowsocks/shadowsocks.git@master
- 启用 fastopen
echo 3 > /proc/sys/net/ipv4/tcp_fastopen
- 支持更多的 tcp 连接
vi /etc/security/limits.conf
添加如下:
* soft nofile 51200
* hard nofile 51200在启动 ssserver 之前让其临时生效: ulimit -n 51200
- 优化内核参数
vim /etc/sysctl.conf
添加如下:
fs.file-max = 51200

net.core.rmem_max = 67108864
net.core.wmem_max = 67108864
net.core.netdev_max_backlog = 250000
net.core.somaxconn = 4096

net.ipv4.tcp_syncookies = 1
net.ipv4.tcp_tw_reuse = 1
net.ipv4.tcp_tw_recycle = 0
net.ipv4.tcp_fin_timeout = 30
net.ipv4.tcp_keepalive_time = 1200
net.ipv4.ip_local_port_range = 10000 65000
net.ipv4.tcp_max_syn_backlog = 8192
net.ipv4.tcp_max_tw_buckets = 5000
net.ipv4.tcp_fastopen = 3
net.ipv4.tcp_mem = 25600 51200 102400
net.ipv4.tcp_rmem = 4096 87380 67108864
net.ipv4.tcp_wmem = 4096 65536 67108864
net.ipv4.tcp_mtu_probing = 1
net.ipv4.tcp_congestion_control = hybla使其生效: sysctl -p
- 新建 ss 配置文件
vim /etc/shadowsocks.json
{
    "server":"购买的vps服务器的IP",
    "server_port":8988,       #随便写个端口
    "local_address": "127.0.0.1",            #不用改
    "local_port":1080,              #不用改
    "password":"设置个密码",        #这个和vps的登录密码是不同的
    "timeout":600,
    "method":"chacha20-ietf-poly1305",        # 加密方式推荐选用 chacha20-ietf-poly1305" or "aes-256-gcm,默认是aes-256-cfb
    "fast_open": true    # 需开启centos的fastopen参数,默认是false
}- ss 多用户相关配置
此操作非必须,在你想给其他人分享此 ss 服务器但又不想让他和你共用一个 ss 端口及密码时才需要配置此项.
vim /etc/shadowsocks.json
多用户配置文件内容如下:
{
    "server":"149.28.77.99",
    "port_password":{
         "10988":"mypasswd", # 10988是端口,mypasswd是密码
         "10999":"passwd"    #想添加几个用户就添加几项此内容,但最后一项不能用逗号结尾
    },
    "local_address": "127.0.0.1",
    "local_port":1080,
    "timeout":600,
    "method":"chacha20-ietf-poly1305",
    "fast_open": true
}配置完成后还是用命令ssserver -c /etc/shadowsocks.json -d start/stop/restart启动或重启.
详细配置请参考: ss 多用户配置
- ss 命令:
ssserver -c /etc/shadowsocks.json -d start/stop/restart
查看 ss 日志:
sudo less /var/log/shadowsocks.log
- 修改登录密码
passwd root
- ssh 安全设置
需先关闭 selinux,setenforce 0
vim /etc/ssh/sshd_config
Port 10222
PermitEmptyPasswords no
PasswordAuthentication no
UseDNS no生成 ssh-key 秘钥 ssh-keygen -t rsa -b 4096 -f ~/.ssh/id_rsa_ss
将~/.ssh/id_rsa_ss.pub上传到 vps 服务器并改名为authorized.keys
- firewalld 配置
如果使用 firewalld 作为默认防火墙请使用如下配置:
firewall-cmd --zone=public --list-ports
firewall-cmd --state
firewall-cmd --get-active-zones
firewall-cmd --zone=public --list-rich-rules
firewall-cmd --zone=public --add-port=8988/tcp --permanent
firewall-cmd --zone=public --add-port=10222/tcp --permanent
firewall-cmd --list-service
firewall-cmd --reload- iptables 配置
如果使用 iptables 作为默认防火墙请使用如下配置
systemctl stop firewalld
systemctl disable firewalld
yum -y install iptables-services
防火墙设置脚本
iptables -A INPUT -p tcp -m state --state RELATED,ESTABLISHED -j ACCEPT
iptables -A INPUT -i lo -j ACCEPT
iptables -A INPUT -p tcp -d 127.0.0.1 -s 127.0.0.1 -j ACCEPT
iptables -A INPUT -p tcp -m multiport --dports 8988,443,10222 -m state --state NEW -j ACCEPT
iptables -A INPUT -p udp -m udp --sport 53 -j ACCEPT
iptables -A INPUT -p udp -m udp --dport 53 -j ACCEPT
iptables -A INPUT -p icmp --icmp-type 8 -m limit --limit 5/minute --limit-burst 5  -j ACCEPT
iptables -A INPUT -p icmp -m icmp --icmp-type 0 -j ACCEPT
iptables -P INPUT DROP
iptables -P FORWARD DROP
iptables -P OUTPUT ACCEPT
systemctl  start iptables
systemctl enable iptables
rm -rf /etc/sysconfit/iptables
rm -rf /etc sysconfit/iptables.sava
service iptables save- ss 开机启动
将 ss 服务添加到 rc.local 中
vim /etc/rc.local
添加如下内容:
/usr/bin/ssserver -c /etc/shadowsocks.json -d start安装 ss 客户端
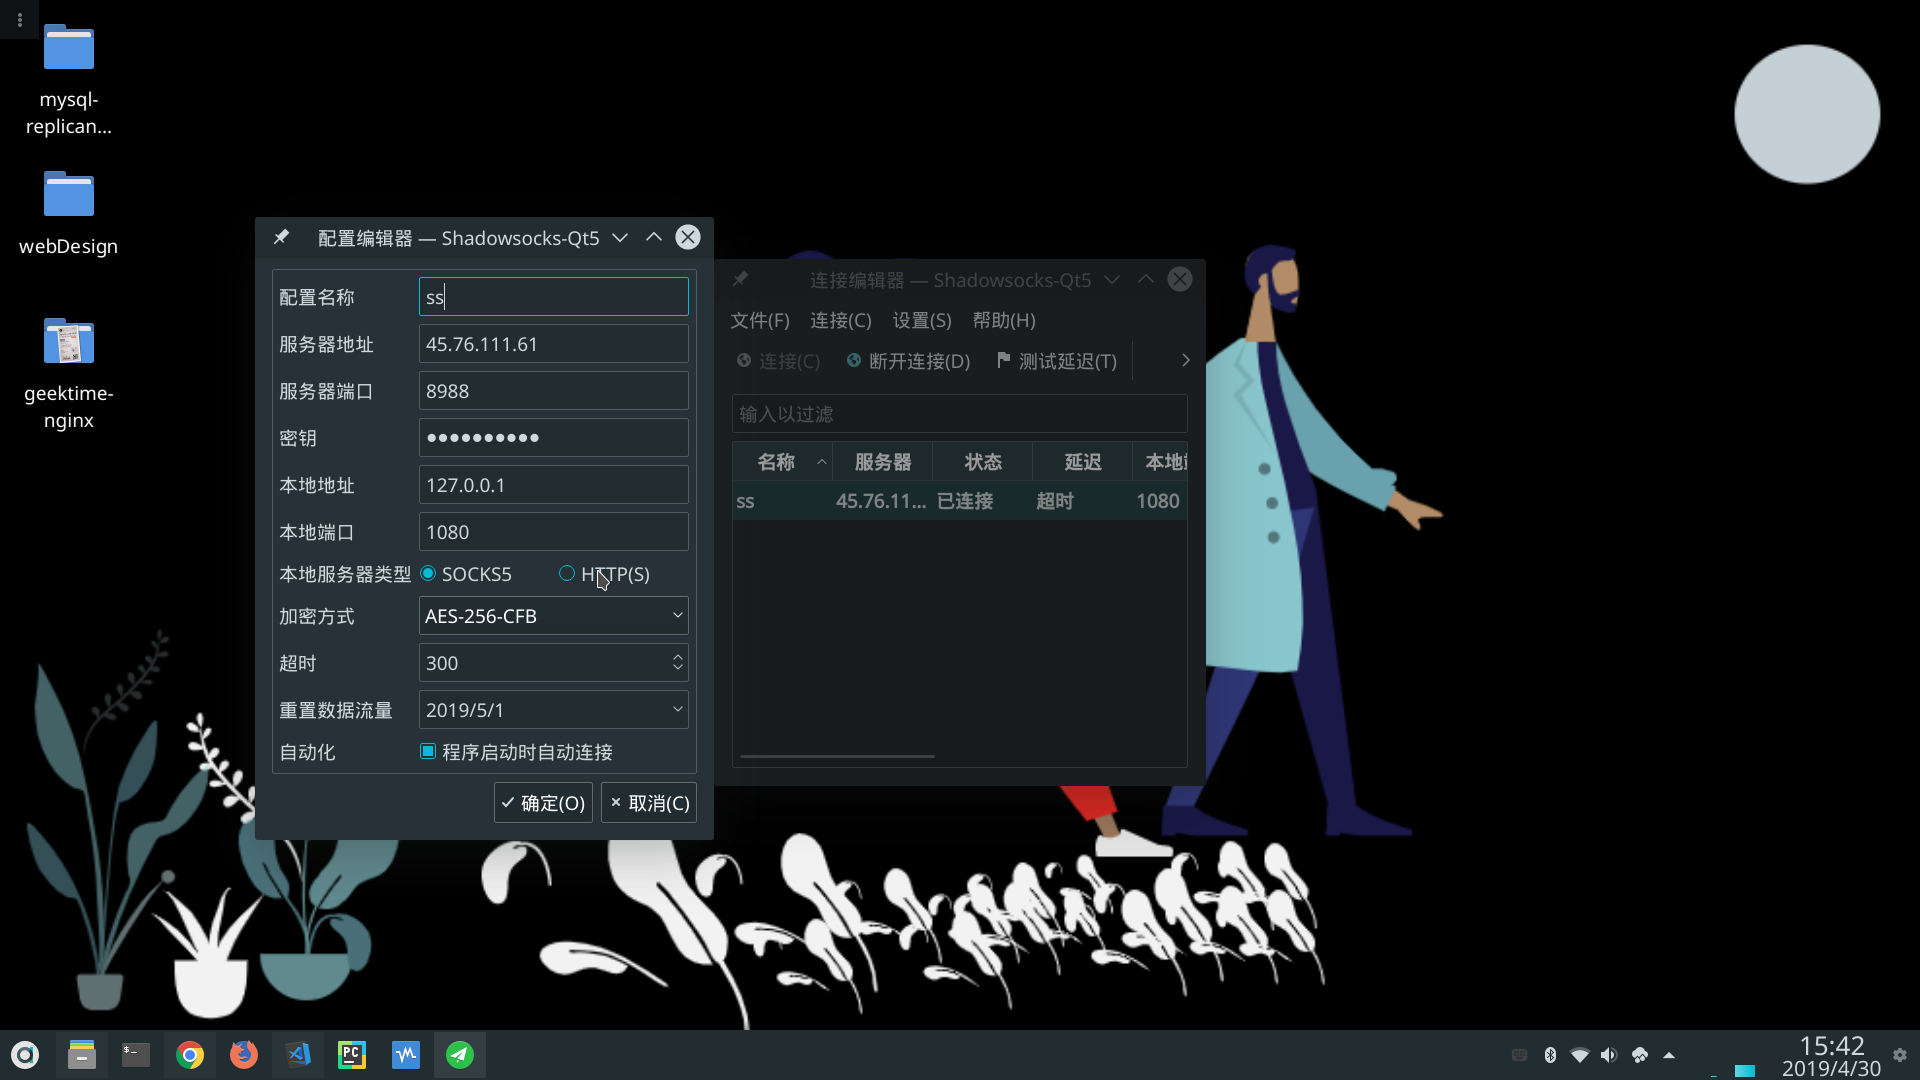
因为本人使用的是 linux 系统所以只介绍下 linux 下 ss 客户端的配置,linux 下的 ss 客户端可使用 shadowsocks-Qt5 安装 ss-client:
sudo pacman -S shadowsocks-qt5
网络代理设置
网络代理分为全局和浏览器代理
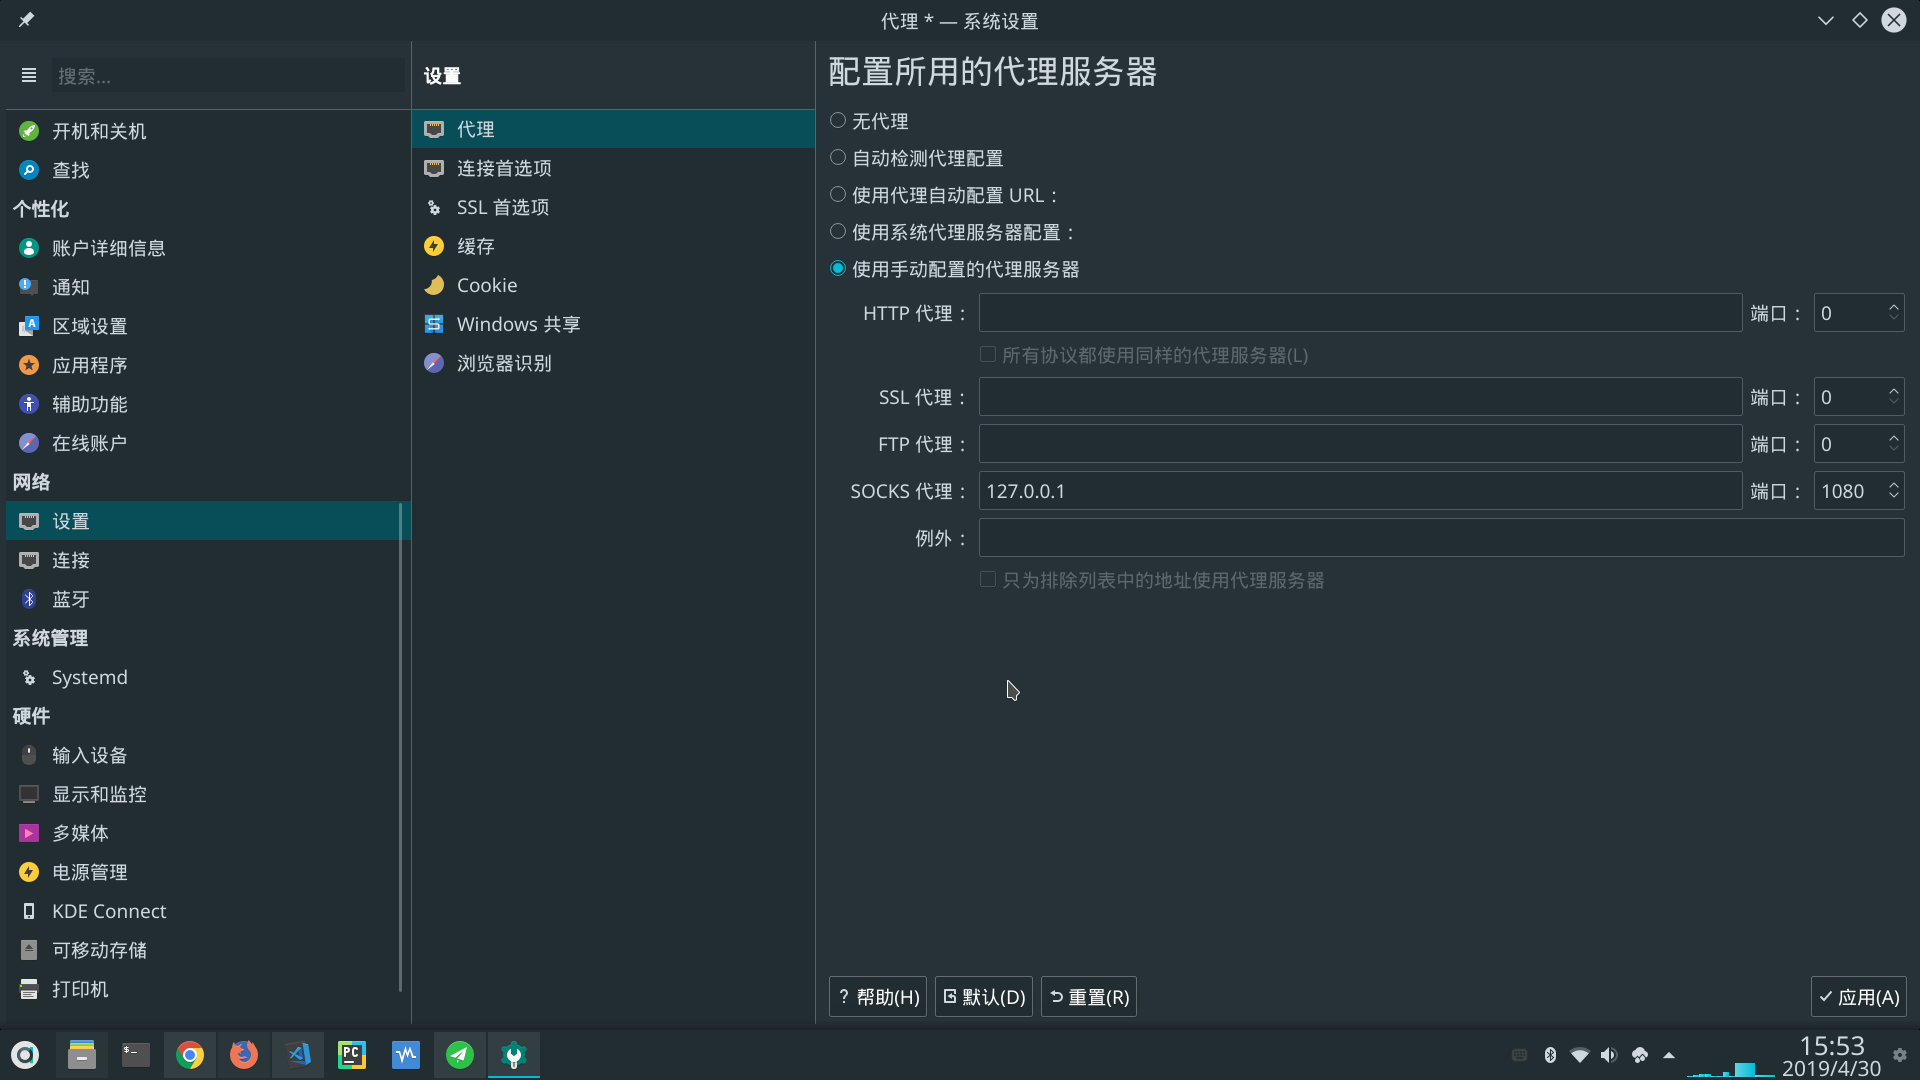
- 全局设置 通过全局设置代理后所有的流量都走代理,以至于连访问国内的网站都走的代理,所以会很慢.
- 安装浏览器代理插件 (推荐使用)
chrome 浏览器:
打开 chrome 浏览器,进入到设置---系统---打开您计算机的代理设置这样就会自动打开你电脑上的代理设置,然后新建一个SOCKS代理,地址填:127.0.0.1,端口填:1080.
这里的前提是你已搭建好 ss 服务器以及完成了本地的 ss 客户端配置.
此时你应该可以打开 google 应用商店了,然后在里面搜索Proxy SwitchyOmega安装并启用,再参照上文添加一条 socks 代理即可.此时就可以关闭操作系统的 socks 代理了.
firefox 或者 chromium:
如果是 firefox 或者 chromium 可以去ss 浏览器插件下载地址:下载插件,然后将下载好的插件拖到浏览器-扩展项目里并启用即可.
注意
ss 浏览器插件(SwitchyOmega)目前只适用于 chromium 和 firefox 并不能用于 chrome 浏览器.
设置 ss 快捷登录别名
设置 ss 别名:
vim ~/.bashrc
在其末尾添加:
alias ss='ssh 45.76.111.61'
让配置生效
source ~/.bashrc
添加秘钥: 在使用多个 ssh-key 时通过 config 文件管理多个 ssh-key 秘钥
vim ~/.ssh/config
# ss
Host 45.76.111.61
    HostName 45.76.111.61
    PreferredAuthentications publickey
    User root
    Port 10222
IdentityFile ~/.ssh/id_rsa_ss配置多个 ssh-key 相关内容请参考:
配置完成后就可以用 ss 直接登录 vps 服务器了。
ss 代理 openwrt 源
访问 openwrt 源比较慢,所以想通过 ss 实现代理访问 openwrt 源.
实现原理:
安装 nginx
1: 先安装 yum 扩展包
sudo yum install yum-utils
2: 新增 nginx.repo 文件
sudo vim /etc/yum.repos.d/nginx.repo
添加:
[nginx-stable]
name=nginx stable repo
baseurl=http://nginx.org/packages/centos/$releasever/$basearch/
gpgcheck=1
enabled=1
gpgkey=https://nginx.org/keys/nginx_signing.key
module_hotfixes=true

[nginx-mainline]
name=nginx mainline repo
baseurl=http://nginx.org/packages/mainline/centos/$releasever/$basearch/
gpgcheck=1
enabled=0
gpgkey=https://nginx.org/keys/nginx_signing.key
module_hotfixes=true3: 启用 nginx 源
sudo yum-config-manager --enable nginx-mainline
4: 安装 nginx
sudo yum install nginx
配置 nginx 代理
sudo vim /etc/nginx/conf.d/default.conf
使其内容为:
server {
    listen       9080;
    server_name  149.28.236.188;

    add_header Access-Control-Allow-Origin *;
    add_header Access-Control-Allow-Headers X-Requested-With;
    add_header Access-Control-Allow-Methods GET,POST,OPTIONS;

    access_log  /var/log/nginx/host.access.log  main;

    location / {
        root   /usr/share/nginx/html;
        index  index.html index.htm;
    }

    location /openwrt_core/ {
            proxy_pass http://downloads.openwrt.org/releases/19.07.2/targets/ramips/mt7621/packages/;
        }

        location  /openwrt_kmods/ {
            proxy_pass http://downloads.openwrt.org/releases/19.07.2/targets/ramips/mt7621/kmods/4.14.171-1-2e88863ccdd594fb8e842df3c25842ee/;
        }

        location /openwrt_base/ {
            proxy_pass http://downloads.openwrt.org/releases/19.07.2/packages/mipsel_24kc/base/;
        }

         location /openwrt_luci/ {
            proxy_pass http://downloads.openwrt.org/releases/19.07.2/packages/mipsel_24kc/luci/;
        }

        location /openwrt_packages/ {
            proxy_pass http://downloads.openwrt.org/releases/19.07.2/packages/mipsel_24kc/packages/;
        }

        location  /openwrt_routing/ {
            proxy_pass http://downloads.openwrt.org/releases/19.07.2/packages/mipsel_24kc/routing/;
        }

        location /openwrt_telephony/ {
            proxy_pass http://downloads.openwrt.org/releases/19.07.2/packages/mipsel_24kc/telephony/;
        }

    error_page   500 502 503 504  /50x.html;
    location = /50x.html {
        root   /usr/share/nginx/html;
    }

}启动 nginx: /usr/sbin/nginx
防火墙中开放 9080 端口
firewall-cmd --zone=public --add-port=9080/tcp --permanent
firewall-cmd --reload
配置 openwrt
在 openwrt 中的 系统---software---Configure opkg---opkg/distfeeds.conf中添加如下内容:
src/gz openwrt_core http://149.28.236.188:9080/openwrt_core
src/gz openwrt_kmods http://149.28.236.188:9080/openwrt_kmods
src/gz openwrt_base http://149.28.236.188:9080/openwrt_base
src/gz openwrt_luci http://149.28.236.188:9080/openwrt_luci
src/gz openwrt_packages http://149.28.236.188:9080/openwrt_packages
src/gz openwrt_routing http://149.28.236.188:9080/openwrt_routing
src/gz openwrt_telephony http://149.28.236.188:9080/openwrt_telephony再重新执行opkg update会发现速度快了很多.
下面的是 openwrt 默认的源:
src/gz openwrt_core http://downloads.openwrt.org/releases/19.07.2/targets/ramips/mt7621/packages
src/gz openwrt_kmods http://downloads.openwrt.org/releases/19.07.2/targets/ramips/mt7621/kmods/4.14.171-1-2e88863ccdd594fb8e842df3c25842ee
src/gz openwrt_base http://downloads.openwrt.org/releases/19.07.2/packages/mipsel_24kc/base
src/gz openwrt_luci http://downloads.openwrt.org/releases/19.07.2/packages/mipsel_24kc/luci
src/gz openwrt_packages http://downloads.openwrt.org/releases/19.07.2/packages/mipsel_24kc/packages
src/gz openwrt_routing http://downloads.openwrt.org/releases/19.07.2/packages/mipsel_24kc/routing
src/gz openwrt_telephony http://downloads.openwrt.org/releases/19.07.2/packages/mipsel_24kc/telephonyWARNING
配置 openwrt 源时不用安装 ss 服务端和客户端,只需要用到 nginx.
v2ray+websocket+TLS+Nginx
目前 ss 已经很不稳定了,所以换了 v2ray,通过 nginx+websocket+TLS 来伪装流量.
如何选取适合自己的配置

常见的配置有:
1: websocket+tls+nginx
2: http2+tls+caddy
原理
V2Ray 做客户端,则 inbound 接收来自浏览器数据(浏览器 socks 发送的数据包),由 outbound 发出去(通常是发到 V2Ray 服务器);
V2Ray 做服务器,则 inbound 接收来自 V2Ray 客户端的数据,由 outbound 发出去(通常是如 Google 等想要访问的目标网站
数据包流向:
{浏览器} <--(socks)--> {V2Ray 客户端 inbound <-> V2Ray 客户端 outbound} <--(VMess)--> {V2Ray 服务器 inbound <-> V2Ray 服务器 outbound} <--(Freedom)--> {目标网站}
前期准备
1: 一台 vps 服务器并安装了 linux 系统
2: 一个域名,无备案要求,域名解析到 vps 的地址,如果套了 CF 的 CDN,则指向 CF 给的 ip 或者别名网址(cname).namesilo 购买域名
3: 申请一个 ssl 证书,也可安装certbot来自动部署 Let's Encrypt 颁发的免费数字证书.
4: 在 vps 搭建个静态网站,将申请的域名指向这个静态网站(非必须),此操作是让我们的流量看起来更正常.
5: 校验服务器时间,v2ray 对时间要求比较严,要保证服务器端时间和客户端时间不能超过 90s,sudo date --set="2017-01-22 16:16:23".
安装 BBR
BBR 会加速网络数据包的传送,在 centos8 中默认是安装了,通过lsmod | grep bbr查看是否启动了 BBR.
内核要4.9以上,centos7 内核是3.10
修改 kernel 参数配置文件 sysctl.conf 并指定开启 BBR
使用了其他 Linux 发行版,那么建议你建立 /etc/sysctl.d/ 文件夹,并在这个文件夹内建立自己的配置文件,形如 /etc/sysctl.d/vpsadmin.conf
把下面的内容添加进去
net.core.default_qdisc=fq
net.ipv4.tcp_congestion_control=bbr

grep -qxF 'net.core.default_qdisc=fq' /etc/sysctl.conf || echo 'net.core.default_qdisc=fq' >> /etc/sysctl.conf
grep -qxF 'net.ipv4.tcp_congestion_control=bbr' /etc/sysctl.conf || echo 'net.ipv4.tcp_congestion_control=bbr' >> /etc/sysctl.conf
sysctl -p

echo "net.core.default_qdisc=fq" >> /etc/sysctl.conf
echo "net.ipv4.tcp_congestion_control=bbr" >> /etc/sysctl.conf
sysctl -p
lsmod | grep bbr重启 VPS、使内核更新和BBR设置都生效
sudo reboot
安装 v2ray
使用 v2ray 官方提供的安装脚本
安裝和更新 V2Ray

// 安裝執行檔和 .dat 資料檔
# bash <(curl -L https://raw.githubusercontent.com/v2fly/fhs-install-v2ray/master/install-release.sh)


安裝最新發行的 geoip.dat 和 geosite.dat

// 只更新 .dat 資料檔
# bash <(curl -L https://raw.githubusercontent.com/v2fly/fhs-install-v2ray/master/install-dat-release.sh)

移除 V2Ray
# bash <(curl -L https://raw.githubusercontent.com/v2fly/fhs-install-v2ray/master/install-release.sh) --remove此脚本会自动安装以下文件:
installed: /usr/local/bin/v2ray     #V2Ray 程序
installed: /usr/local/bin/v2ctl     #V2Ray 工具
installed: /usr/local/share/v2ray/geoip.dat  # IP 数据文件
installed: /usr/local/share/v2ray/geosite.dat    # 域名数据文件
installed: /usr/local/etc/v2ray/config.json  # 配置文件
installed: /var/log/v2ray/
installed: /var/log/v2ray/access.log
installed: /var/log/v2ray/error.log
installed: /etc/systemd/system/v2ray.service
installed: /etc/systemd/system/v2ray@.service
removed: /tmp/tmp.fQI1BUqol5
info: V2Ray v4.45.0 is installed.
You may need to execute a command to remove dependent software: dnf remove curl unzip
Please execute the command: systemctl enable v2ray; systemctl start v2ray配置 v2ray 服务端
配置文件在/etc/v2ray/config.json
虽然 v2ray 给我们生成了 UUID,但最好还是通过cat /proc/sys/kernel/random/uuid或者v2ctl uuid重新生成 UUID,一定要记得这个 UUID,这个就相当于是通信的密码.
下面是服务器的配置:
json 不支持注释,所以使用时要删除所有的注释
{
  "inbounds": [
    {
      "port": 18888, // v2ray使用的端口
      "listen": "127.0.0.1", // V2Ray只监听本机,因为还要用nginx进行反代
      "protocol": "vmess",
      "settings": {
        "clients": [
          {
            "id": "你的UUID", // 自己生成的UUID
            "level": 1,
            "alterId": 64 // 加强防探测能力,越大服务端占用内存越多,alterId 的大小要保证客户端的小于等于服务器的
          }
        ]
      },
      "streamSettings": {
        "network": "ws", // websocket协议
        "wsSettings": {
          "path": "/out" // 需和nginx中配置的一样
        }
      }
    }
  ],
  "outbounds": [
    {
      "protocol": "freedom", // 直连目标网站
      "settings": {}
    },
    {
      "protocol": "blackhole", // 丢弃链接
      "settings": {},
      "tag": "blocked"
    }
  ],
  "routing": {
    "rules": [
      {
        // 默认规则,禁止访问服务器内网
        "type": "field",
        "ip": ["geoip:private"],
        "outboundTag": "blocked"
      }
    ]
  }
}启动 v2ray
systemctl enable v2ray # 开机启动 v2ray
systemctl start v2ray # 启动 v2ray
/usr/bin/v2ray/v2ray -test -config /etc/v2ray/config.json # 测试配置文件是否正确
安装 nginx
sudo yum install yum-utils
sudo vim /etc/yum.repos.d/nginx.repo
添加:
[nginx-stable]
name=nginx stable repo
baseurl=http://nginx.org/packages/centos/$releasever/$basearch/
gpgcheck=1
enabled=1
gpgkey=https://nginx.org/keys/nginx_signing.key
module_hotfixes=true

[nginx-mainline]
name=nginx mainline repo
baseurl=http://nginx.org/packages/mainline/centos/$releasever/$basearch/
gpgcheck=1
enabled=0
gpgkey=https://nginx.org/keys/nginx_signing.key
module_hotfixes=true启用 nginx 源
sudo yum-config-manager --enable nginx-mainline
安装 nginx
sudo yum install nginx
开机启动 nginx
systemctl enable nginx
配置 nginx
vim /etc/nginx/conf.d/default.conf
配置文件如下:
server{
    listen 80;
    server_name 你的域名;
    rewrite ^/(.*)$ https://你的域名/$1 permanent;
}

server {
    listen       443 ssl http2;
    server_name  你的域名;

    ssl_certificate    ssl证书.pem;
    ssl_certificate_key    ssl证书.key;
    ssl_session_timeout 1d;
    ssl_session_cache shared:MozSSL:10m;
    ssl_session_tickets off;

    ssl_protocols         TLSv1.2 TLSv1.3;
    ssl_ciphers           ECDHE-ECDSA-AES128-GCM-SHA256:ECDHE-RSA-AES128-GCM-SHA256:ECDHE-ECDSA-AES256-GCM-SHA384:ECDHE-RSA-AES256-GCM-SHA384:ECDHE-ECDSA-CHACHA20-POLY1305:ECDHE-RSA-CHACHA20-POLY1305:DHE-RSA-AES128-GCM-SHA256:DHE-RSA-AES256-GCM-SHA384;
    ssl_prefer_server_ciphers off;

location / {
            root /usr/share/nginx/html/wwwdoc;     # 此项配置是部署静态网站,使访问域名时能正常访问
            index index.html index.htm;
}

location /out {
    if ($http_upgrade != "websocket") {       # 不是ws流量返回404
        return 404;
    }
    proxy_pass       http://127.0.0.1:18888;  # 反向代理到v2ray,端口需和v2ray配置的一样
    proxy_redirect             off;
    proxy_http_version         1.1;
    proxy_set_header Upgrade   $http_upgrade;
    proxy_set_header Connection "upgrade";
    proxy_set_header Host $host;
    # Show real IP in v2ray access.log
    proxy_set_header X-Real-IP $remote_addr;
    proxy_set_header X-Forwarded-For $proxy_add_x_forwarded_for;
    }
}WARNING
记得重启 v2ray 和 nginx
配置防火墙
firewall-cmd --zone=public --add-port=443,80/tcp --permanent
firewall-cmd --zone=public --remove-port=18888/tcp --permanent
firewall-cmd --reload
TIP
这里只开放了 443 和 80 端口,443 端口是我们通过 v2ray 客户端时需要的端口,而开放 80 端口的目的是我们通过域名访问时能正常显示静态网站内容,主要是混淆目的.
配置 v2ray 客户端
我的是 linux 系统,所以通过命令安装sudo pacman -S v2ray
{
  "log": {
    "loglevel": "info",
    "access": "/etc/v2ray/access.log",
    "error": "/etc/v2ray/error.log"
  },
  "inbounds": [
    {
      "port": 1080,
      "protocol": "socks",
      "sniffing": {
        "enabled": true,
        "destOverride": ["http", "tls"] // 只解析http和tls两种流量包
      },
      "settings": {
        "auth": "noauth", // 不开启验证
        "udp": true
      }
    }
  ],
  "outbounds": [
    {
      "tag": "proxy", // 配置的代理,应用于国外网址
      "protocol": "vmess",
      "settings": {
        "vnext": [
          {
            "address": "你的域名",
            "port": 443,
            "users": [
              {
                "id": "你的UUID",
                "alterId": 64
              }
            ]
          }
        ]
      },
      "streamSettings": {
        "network": "ws", // websocket协议
        "security": "tls", // ssl加密
        "tlsSettings": {
          "serverName": "你的域名"
        },
        "wsSettings": {
          "path": "/out" // nginx设置的location
        }
      }
    },
    {
      "tag": "direct", //tag在此处没作用,只有在routing中有作用.
      "protocol": "freedom", // 直连,不使用代理
      "settings": {
        "domainStrategy": "UseIP" // 使用UseIP避免直连时因为使用本机的 DNS 出现一些奇怪问题
      }
    },
    {
      "tag": "dns-out", // 使用内置的DNS服务
      "protocol": "dns"
    },
    {
      "protocol": "blackhole",
      "settings": {},
      "tag": "blocked"
    }
  ],
  "dns": {
    "servers": [
      "8.8.8.8",
      "1.1.1.1",
      "223.5.5.5",
      {
        "address": "ISP DNS", // 你的ISP提供的域名,国内流量使用此DNS
        "port": 53,
        "domains": [
          "geosite:cn", // 国内域名的数据信息,非完整,可自行添加
          "ntp.org", // 时间服务器域名,v2ray对时间有要求,所以需加上此项
          "你的域名" // 加上你的域名是防止不能连接vps
        ]
      }
    ]
  },
  "routing": {
    "domainStrategy": "IPOnDemand", // DNS精准匹配,但解析速度会慢.
    "rules": [
      {
        "type": "field",
        "port": 53,
        "network": "udp",
        "outboundTag": "dns-out" // dns的udp协议走此路由.对应outbounds中的tag为dns-out的段
      },
      {
        "type": "field",
        "port": 123,
        "network": "udp",
        "outboundTag": "direct" // ntp使用直连,不用代理.
      },
      {
        "type": "field",
        "ip": [
          "ISP DNS", // 国内的DNS的ip使用直连
          "223.5.5.5"
        ],
        "outboundTag": "direct"
      },
      {
        "type": "field",
        "ip": ["8.8.8.8", "1.1.1.1"],
        "outboundTag": "proxy" // 国外的DNS的ip走代理
      },
      {
        "type": "field",
        "ip": ["geoip:private", "geoip:cn"],
        "outboundTag": "direct" // 国内的ip及局域网地址走直连
      },
      {
        "type": "field",
        "domain": ["geosite:cn"],
        "outboundTag": "direct" // 国内的网站走直连,并非涵盖全部的网站
      },
      // 使用第三方域名文件
      // cd /usr/lib/v2ray && wget https://github.com/ToutyRater/V2Ray-SiteDAT/blob/master/geofiles/h2y.dat
      {
        "type": "field",
        "outboundTag": "blocked",
        "domain": [
          "ext:h2y.dat:ad" // 拦截广告相关域名
        ]
      },
      {
        "type": "field",
        "outboundTag": "proxy",
        "domain": [
          "ext:h2y.dat:gfw" // 被 gfw 屏蔽的域名走代理
        ]
      },
      {
        "type": "field",
        "network": "tcp,udp",
        "outboundTag": "direct" // 默认直连
      }
    ]
  }
}DNS 解析: 先使用 ISP DNS 找不到就依次使用 8.8.8.8 -> 1.1.1.1 -> 223.5.5.5
DNS 配置只是说明哪些域名查哪个 DNS,至于哪个 DNS 走代理哪个 DNS 直连要在 routing 里设置规则
配置好后启动 v2ray 客户端,systemctl start v2ray
然后在浏览器中使用SwitchyOmega代理本地的代理进行科学上网。
代理协议如果为
SOCKS5,代理服务器填127.0.0.1,端口填10808.代理协议如果为
HTTP,代理服务器填127.0.0.1,端口填10809
上面的端口不是随便写的,是可以在v2ray客户端的左下方查找到。
使终端也能科学上网
export http_proxy="http://127.0.0.1:8889"
export https_proxy="http://127.0.0.1:8889"

#socks5
git config --global http.proxy 'socks5://127.0.0.1:1089'
git config --global https.proxy 'socks5://127.0.0.1:1089'

#http
git config --global http.proxy 'http://127.0.0.1:1089'
git config --global https.proxy 'http://127.0.0.1:1089'

https://qv2ray.net/lang/zh/getting-started/step5.html#%E8%B0%83%E6%95%B4%E8%B7%AF%E7%94%B1%E8%AE%BE%E7%BD%AE
首选项 - 入站设置 - 把监听地址从127.0.01改成0.0.0.0  实现局域网代理上网,ubuntu 代理设置地址为 fedora 本机地址   https://github.com/Qv2ray/Qv2ray/issues/414

git config --global --unset http.proxy
git config --global --unset https.proxysudo package -S proxychains-ng
sudo vim /etc/proxychains.conf
文件末尾添加:
socks5 127.0.0.1 1080
然后,大多数的终端软件就可以上网了,例如:
proxychains curl www.google.com

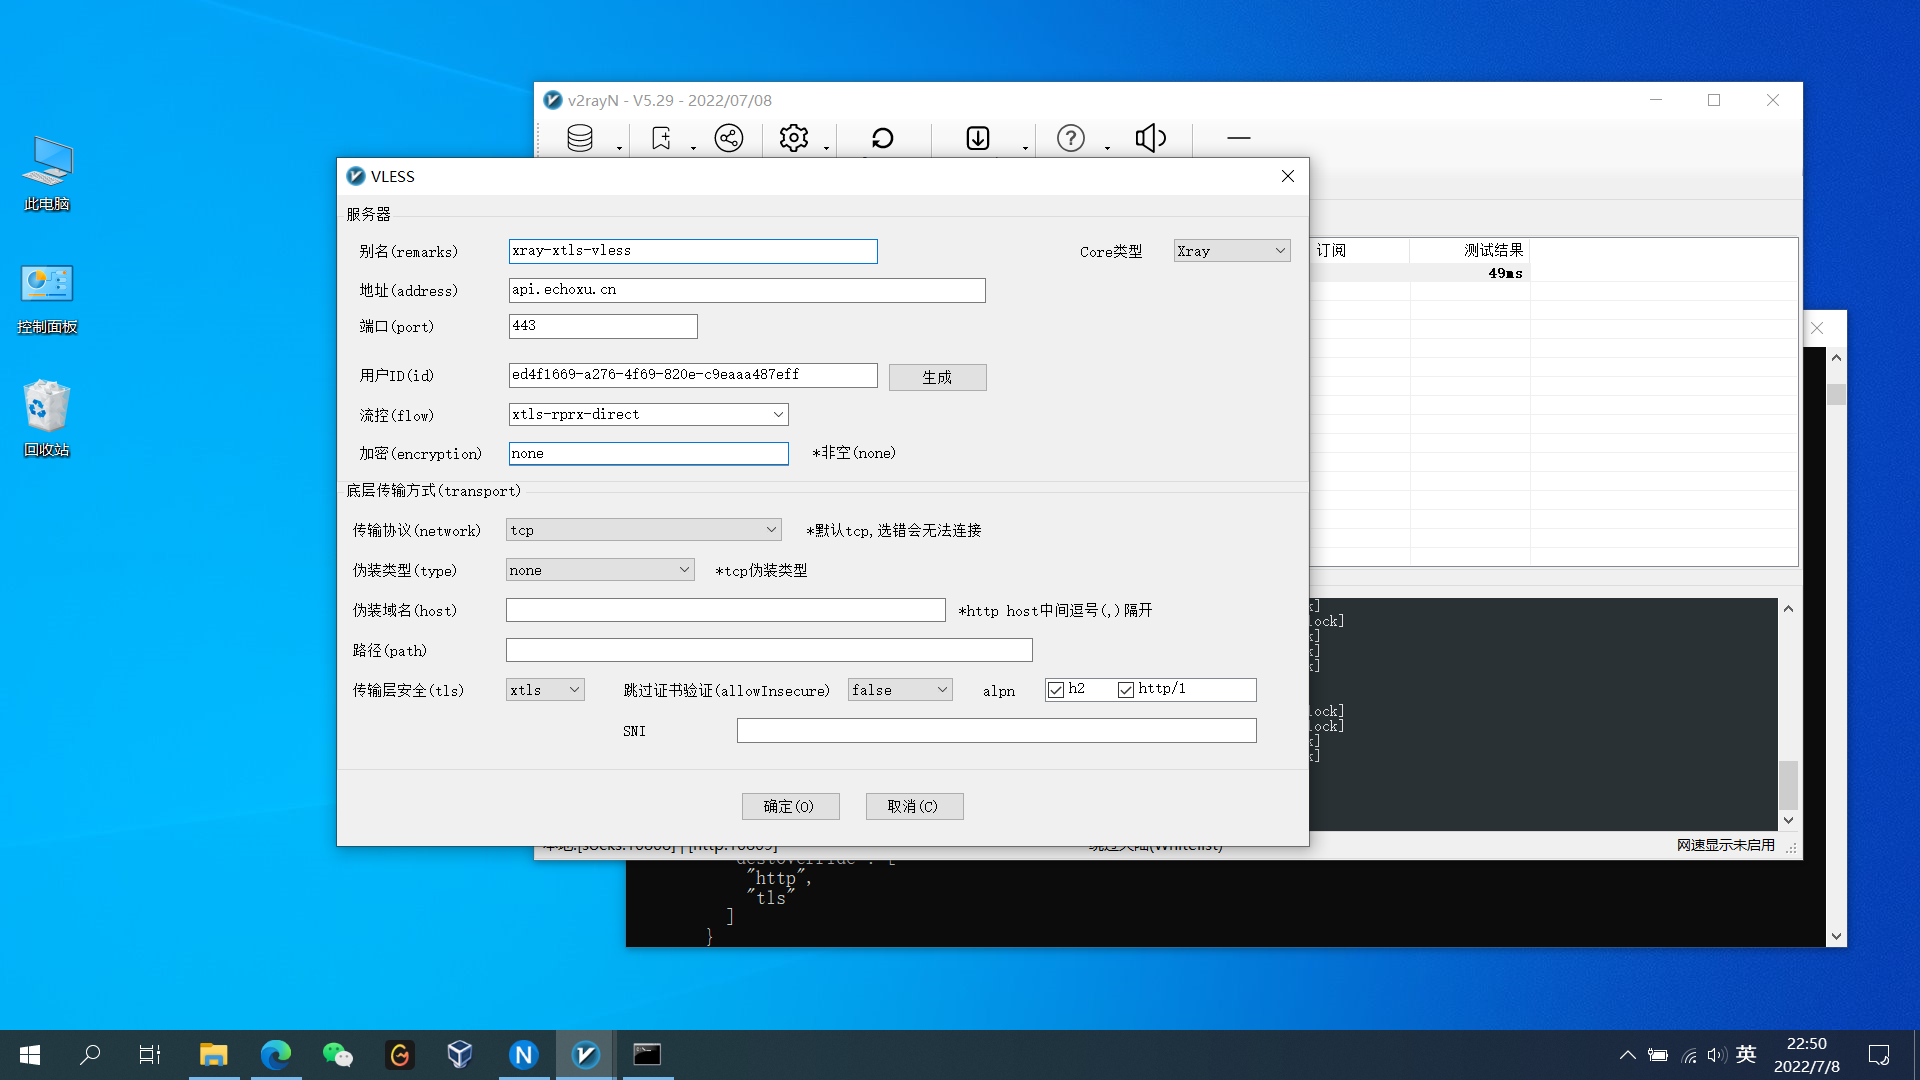
安装 xray
安装: bash -c "$(curl -L https://github.com/XTLS/Xray-install/raw/main/install-release.sh)" @ install
- v2ray 配置 xray + xtls 详细如下图: